I have a little problem. I'm addicted to cookbooks, food writing, recipe collecting, and cooking. I have a lot of recipes waiting for me to try them, and ideas from articles, tv, and restaurants often lead to new dishes. I started losing track of what I've done. So now I'm taking photos and writing about what I've prepared—unless it's terrible in which case I forget it ever happened.
The photos seen here do not adequately convey how good this lasagne was. It was all flavor and no photogenic ability, but this was my favorite thing I’ve eaten for weeks. It was dreamy good and incredibly so given how few ingredients made up each component. For instance, asparagus and parmigiano reggiano are meant to be together. I had wanted to make this lasagne for awhile but waited until I could get asparagus in season. I also waited until I could devote the better part of an afternoon to the many steps involved in making it. This is found in the book On Top of Spaghetti by Johanne Killeen and George Germon which I’ve gushed about a timeor two. I had read through all the instructions for the lasagne, had all the ingredients, and was excited to finally get started.
First, I began making the fresh pasta following the recipe for George’s Fresh Pasta on page 212. There is a very specific explanation of how much egg is to be used: two jumbo eggs, weighing four and one-half ounces in their shells, slightly over one-half cup but less than two-thirds cup. Right, so I used two eggs which seemed to be in the acceptable volume range, and I used two cups plus two tablespoons 00 flour as advised. This was mixed in a food processor with salt, and one tablespoon of hot tap water was added at the end. The result was unworkable, dry, hard pasta dough that was soon scooped into the garbage. Rather than admitting defeat and going to buy dried lasagne, I called Kurt and talked him into getting eggs on his way home. I checked Marcella’s recipe which I’ve used before successfully, and her ratio was four eggs to two cups of flour. For pasta dough round two, that’s what I used again with the 00 flour. That worked perfectly and produced beautiful pasta dough but put me an hour and a half behind in the preparation. There was no turning back though.
Two pounds of asparagus were roasted, onions were sauteed. The roasted asparagus was chopped and added to the onions. Milk was simmered with some lemon peel and then used to make the bechamel. All of this transpired while the rolled and cut pasta sheets dried. Said pasta sheets were then briefly boiled, shocked in ice water, and drained on towels. Then, the layering began. A baking dish was sprayed with oil, pasta sheets went into the bottom allowing for them to come up the sides and overhang the dish. Bechamel found its way onto the pasta sheets followed by grated parmigiano reggiano followed by the asparagus onion mixture and some cream. This was repeated with more pasta sheets that fit inside the ones overhanging. Once all the layers were in place, the overhanging sheets were tucked over top, and the remaining bechamel and cheese were spread about before the top was drizzled with olive oil. And, just before I nearly passed out from hunger, the lasagne went into the oven for about 30 minutes.
Given that this was not a thirty minute meal, and that I faced certain challenges that set me back in my overall scheduling, I was completely incapable of waiting the full five minutes before cutting and serving. Hence, the photos of the plated lasagne clearly depict the wonderful bechamel and cream as it oozed forth from the layers. Even after it sat for several minutes, this wasn’t a lasagne that held its shape when cut. What I can tell you though, is that roasted asparagus and some onion in concert with a simple bechamel, really good parmigiano reggiano, and homemade pasta is more delicious than I can describe. Do make the pasta, with four eggs, and do use the cream, and find a big chunk of time when you can do all of this because like everything else from this book, it was a pure delight to eat.
We were invited to a bbq today, and I volunteered to bring cookies. Being the indecisive sort and hoping to please everyone with one flavor or the other, I made two kinds. These are from Barefoot Contessa Parties!, and she actually shows three types of cookies in that book. I skipped the basic chocolate chunk cookie because I only had so much time and chocolate, and I really wanted to try the other two. The chocolate white chocolate chunk one drew me in because white chocolate is just the best, and the peanut butter chocolate chunk would obviously be delicious too.
I used Callebaut chocolates for these cookies. Their white chocolate is far and away better than other brands I’ve tried, and their 60% cacao bittersweet worked perfectly with the peanut butter. These are very straightforward cookies, and once the chocolate was chopped, it was all downhill. My peanut butter chocolate chunk cookies didn’t spread quite as much as the white chocolate chunk ones, but other than that there were no issues here. Well, there was one issue. Which flavor was better? Kurt decided the white chocolate narrowly edged out the peanut butter. I also loved the big chunks of white chocolate nestled into the cocoa-rich cookies, but the savory peanuttiness with the dark chocolate was just as appealing. Let me taste them one more time, or two more times, and I’ll get back to you about which one is better.
Today, I have a dish from a food magazine that is quickly becoming my favorite, and that is La Cucina Italiana. This is from a citrus article in the February issue which was full of great food. There was also an article about espresso, and the prawns in aromatic cream sauce with coffee beans looked divine. And, there was an article about truffles, and one about fritters from Venice, and I do like Italian food. I may end up making almost every recipe from the citrus story like the vegetables and orange sauce and chicken with citrus couscous, but first off I made the citrus carbonara.
This dish was intended to be pasta served with pan roasted rabbit. I’m not opposed to cooking rabbit, and I’m not opposed to eating it for that matter, but I wasn’t able to buy any locally this week. The recipe calls for rabbit loins which can be ordered from D’Artagnan, but I wanted to avoid having something shipped so I called around town. Rabbit loins cannot be found in Austin, but whole rabbit may be had at some stores on the right day. When I asked at Whole Foods, they informed me that I would probably never see rabbit sold in their Austin stores because they have not been able to find a local provider that meets their animal compassion guidelines. To this I say: come on Texas-area rabbit ranchers, raise your animals more compassionately so that I can buy them at Whole Foods. Until then or until I place a D’Artagnan order, I’ll be making a vegetarian version of this dish which is what I’m showing here.
Some zest was grated from a tangerine and a lemon. The remaining peels of the tangerine and lemon were removed. I then cut off any pith that came with the peel and thinly sliced the peel. The pasta water was brought to a boil, and the juices from the tangerine and lemon were added to it. While the pasta cooked, the grated zest, egg yolks, grated parmigiano reggiano, and chopped parsley were whisked together with a little water and salt and pepper. The drained pasta was then tossed with the egg and cheese mixture, and some reserved pasta boiling water was added to thin the sauce. On the plate, it received an olive oil drizzle and a topping of sliced citrus peel. The fresh, light citrus flavor made it easy to ignore the calories lurking in the egg yolks and cheese. This was even quicker and simpler to make without the rabbit, and it was completely delicious.
On Monday, on Eat me daily via eater.com, I read that Bon Appetit and Gourmet magazines are getting frightfully slim. However, Saveur is doing great. I can’t imagine Gourmet magazine going out of business even though I’ve never subscribed to it. For that matter, my subscription to Bon Appetit was free and it just ended. I do buy single issues from time to time, so I hope they survive, and I’m thrilled that Saveur continues to succeed. Speaking of magazines, these waffles were in the January issue of Bon Appetit. Once again, it’s a recipe that’s billed as healthy, isn’t really, but you should make it anyway because the waffles are delicious.
The recipe calls for whole flaxseeds, and I always have flaxseeds on hand since I put them on my breakfast cereal. However, I always grind them and never use them whole. The beneficial nutrition in flaxseeds is more easily absorbed when they’re ground, so that’s how I used them here. The batter also includes whole wheat flour in combination with all purpose flour. I changed up the proportions and used three quarters cup of each. There are also two tablespoons of malted milk powder which I thought was interesting, and it did add a nice flavor. The batter was mixed and left to rest before firing up the waffle iron.
I hadn’t made waffles in ages, and it was fun to pull out that too rarely used machine again. I poured in the batter, spread it evenly, and enjoyed the waffle aroma as they cooked for a few short minutes per batch. Then, cream was whipped with honey, and fresh berries were rinsed and stemmed. Just because I can’t resist, a drizzle of pure maple syrup found its way around the berries, over the whipped cream, and into the square waffle dents where it’s meant to pool. You can make the waffles in advance and re-heat them in the oven. I actually like the crispier texture they achieve after a few minutes in the oven. We had some extras which went into the freezer for a future, big, weekend breakfast.
I had heard so much about the book Sunday Suppers at Lucques by Suzanne Goin that I finally got a copy last fall. There’s always a backlog of books I need to read, so I only just got through it a month ago. If you’re not familiar with it, the book showcases meals from the restaurant’s Sunday night, set-menu dinners. It’s organized by season as the food is true to Goin’s interest in using locally-grown, perfectly fresh produce. When I was reading the book, one dish after the next piqued my interest, but the one I absolutely had to have first was the wild striped bass with farro, black rice, green garlic, and tangerine. This just sang of spring to me. It looked fresh and bright and luscious in the photo with the tangerine sauce and segments. So, to celebrate the start of the season I made this on Saturday with just one minor alteration.
I never see wild striped bass in my local stores, but I learned that I could make a special request for it at Whole Foods. Unfortunately, I learned that too late so I proceeded with snapper instead of bass. An issue that required some planning ahead with this dish was the black rice. There is a list of sources in the book which includes one for the rice, but I found Italian black rice on Amazon and purchased it there. Italian black rice, check, farro, check, believe it or not, green garlic was ready and waiting in the produce department of Central Market, so check for that too. Then, in an effort to buy back some carbon footprint from the flown-in rice, I snipped the pea shoots from my garden and used a local viognier from Becker vineyards. Viognier actually does very well in Texas, and this is one of a few good locally grown and bottled options.
When I arrived home with the snapper, I set about seasoning it with tangerine zest and thyme and parsley from my garden. The fish then rested in the refrigerator for about four hours. The rice and farro were cooked separately but similarly with olive oil, onion, bay leaves, wine, and water. Some chile de arbol was added to the rice while the farro received some thyme. Once cooked, both were poured out onto a baking sheet to cool. To complete this part of the dish, sliced green garlic and sliced chile de arbol were sauteed in olive oil before the farro was added. After the farro toasted some, the rice was incorporated and then the pea shoots were added just to wilt. I finished this part and let it stay warm on the stove while then cooking the fish.
The snapper was removed from the refrigerator and allowed to come to room temperature before being quickly seared in olive oil. After a few minutes on each side, it was removed, and the pan was wiped clean. The sauce was a simple reduction of tangerine juice into which butter was whisked and salt and pepper and tangerine segments were added. The fish was placed atop the rice, farro, and pea shoots, and the tangerine sauce and segments were spooned over all.
I had thought about this meal for so long that I really took my time in preparing it. I wanted to make sure I didn’t blank on any crucial steps in the instructions. I have to say again that it just looked so great in the book that I had really worked up high expectations. And, yes, it was that good. The sauce was brightly fruit flavored and not too rich, and the farro and rice were chewy and substantial without being heavy. The chile de arbol and green garlic added nice pops of flavor, the pea shots were freshness itself, and the fish was light and nicely seasoned. Now, I’m planning other ideas for black rice and farro with asparagus and who knows what else, and I’m looking forward to trying more things from this book throughout this spring and the rest of the year.
My sourdough starter seems to be surviving. For this third bread adventure installment, it was used in rustic bread or ciabatta. Once again, this was from Nancy Silverton's Bread from the La Brea Bakery. It was a one-day bread, and the process seemed less frightening to me than the basic country white loaf. However, the very sticky, wet dough was not as lovely to work with as the bagel dough. Silverton explains that the wetter the dough, the bigger the holes. The finished loaf is intended to be flat and oval. Ciabatta takes very well to being dipped in olive oil or turned into garlic bread, and I had a feeling this wouldn’t last long once it was baked. The recipe makes enough dough for two large loaves, and I decided to follow the instructions for making one of them a rustic olive-herb loaf.
The starter was measured and combined with water, bread flour, and half a cake of fresh yeast in the bowl of a stand mixer. After an initial mixing, it was left to rest for 20 minutes. Salt was added, it was mixed more, and then milk, olive oil, and more water were added. After the dough came together, it was left to ferment for two and a half hours. The big blob of wet stickiness was then turned out onto a well-floured board, sprinkled with more flour, covered, and left to sit a bit longer. At that point, the big blob was divided in two, and each was plopped onto parchment paper that had been heavily dusted with bread flour and semolina. Each loaf was dimpled by pressing my index finger all the way down to the parchment paper. More flour was sprinkled on top, they were covered and left to proof for two hours. Dough must get tired very easily as it requires more resting time than either of my cats. After that nap, the loaves were turned over, dimpled again and were finally ready to bake. The olive loaf was studded with pitted picholine olives in all of the dimples and little sprigs of fresh rosemary were tucked into the surface here and there.
The 500 degree oven was spritzed with water before the loaves were placed inside. Now, if you have no intention of baking this bread, just do this one part. Heat your oven to 500 degrees, spritz it with water, and then put something with fresh rosemary sprigs inside it. That immediate aroma of the rosemary hitting the hot steam is simply fantastic, and when it flavors a loaf of bread with some picholine olives, it’s quite a bonus. The temperature was reduced to 450, and the loaves baked for about 35 minutes. I was concerned that my blobs were a bit wide and didn’t seem quite as tall as most ciabatta loaves I’ve seen. I wasn’t sure I would get the nice porous interior that was the goal.
In the end, it worked fine. I think the dough would be easier to handle if there was less of it, so I’ll probably halve the recipe in the future. Now that I’ve experimented with the dough once, hopefully I can get a nicer ciabatta-looking shape and slightly taller loaves when I try again. What I did get this time was really wonderfully chewy, flavorful bread with a nice, crisp crust. When the loaves were cooled and ready to be tasted, we were kind of like kids in a candy store. We couldn’t stop eating this bread, and we didn’t take the time to dip it in olive oil. It was so fresh and so good. I may need to re-think that idea about halving the recipe next time.
I’m submitting this to Yeastspotting where you’ll find some seriously well-made bread.
Back to the files I went, and there are so, so many things in those files. I was in spring cleaning mode, and I managed to sort through two bulging folders of recipes before it was time to do something else. It’s kind of fun to look back and see what pages I cut out of magazines years ago. Some recipes are things I’ve tried since then from other sources and no longer require the pages I saved. With other recipes, I can’t believe they’ve been hidden away for so long and I still haven’t tried them. Such was the case with this salad. My best guess is that it came from a summer issue of Living in 2002. I just searched that site and couldn’t find the recipe, so I’ll include my version at the end of this post.
On a side note, I finally made a trip to MT Supermarket to shop for noodles and whatever else caught my eye. I have to say I was overwhelmed by the number of choices of everything. There are countless varieties of rice, soy sauces, fish sauces, vinegars, and on and on. I literally could not decide which noodles to buy and came home with so many my pantry is overflowing. For anyone in Austin who hasn’t gone there yet, I highly recommend it.
But, back to the salad. There is a lot of chopping and shredding and poaching and cooking, so allow plenty of time to complete it. Or, make the peanut sauce or do some chopping in advance. Every layer of this dish is full of flavor beginning with the chicken. Chicken breasts were poached with ginger, garlic, cilantro stems, and sesame oil. The vegetable mixture included cabbage, carrots, serrano chiles, green onions, mint, and cilantro leaves. And then, the peanut sauce is a powerhouse of flavor accenting everything else. This is exactly the kind of dish in which you can add more of a favorite item, leave out one you don’t like, and still have a very interesting combination. The chicken was tender and delicious, but as I was cooking it, I was thinking about how tofu would be just as good and much quicker. I used green cabbage, but savoy or napa would have been great. I shredded it very thinly on a Benriner, but thicker pieces would have added nice texture. I think I say this of every recipe, but next time, I’ll add more chiles. It’s not just me. Kurt always requests more chile flavor and heat as well. So, change this or add that, and you’ll still have a fantastic salad.
To poach the chicken: 1 three-inch piece of ginger, thinly sliced 4 garlic cloves, peeled, smashed and cut in half 10 cilantro stems 2 T toasted sesame oil 1/2 t salt 2 large, bone-in, skin-on chicken breasts
-in a large saute pan, add ginger, garlic, cilantro, sesame oil, and salt and enough water to reach halfway up the side of the pan; bring to a boil over high heat; add the chicken, reduce heat to medium, and cover; simmer until chicken is cooked through; remove from heat and let stand until cool enough to handle -transfer chicken to a cutting board; remove skin and cut meat from bone, cut meat into small strips or shred with your fingers
Prep vegetables and herbs: 1/2 head green cabbage (or savoy or napa), cored and thinly sliced 6 carrots, peeled and thinly sliced or julienned on slicer 3 serrano chiles, seeded and thinly sliced into long strips 1 bunch green onions, thinly sliced white and green parts 1/2 c fresh mint leaves, chopped 1/2 c fresh cilantro leaves, chopped
-place all sliced and chopped vegetables and herbs in a large mixing bowl
Peanut Sauce: 1 five-inch piece of ginger, peeled and grated 2 shallots, peeled and minced 1/4 c fish sauce 1/2 c soy sauce 3/4 c freshly squeezed lime juice 1 c smooth, natural peanut butter 1/4 c toasted sesame oil 2 T water if needed
-in a large measuring pitcher, combine ginger, shallots, fish sauce, soy sauce, and lime juice; whisk in peanut butter; whisk in sesame oil; if sauce is too thick, whisk in water starting with one tablespoon and adding more as needed
To finish salad: 1 pound rice vermicelli noodles 1/2 c roasted, unsalted peanuts for serving
-bring a large pot of water to a boil; cook noodles according to package instructions or until al dente; transfer to a colander to drain; rinse under cold water, drain, and place on a serving platter -add prepared chicken to bowl of vegetables and herbs and toss to combine; pour half of the peanut sauce over this mixture and toss to coat; taste and add more peanut sauce as desired -to serve, top noodles with chicken salad mixture, drizzle with some remaining peanut sauce, sprinkle with peanuts, and garnish with any extra herbs or green onions Tweet
I returned to Michel Nischan’s book, Taste Pure and Simple, for a light and delicious shellfish meal. This time, I didn’t have to beg any favors to procure all the ingredients. In fact, there are only five ingredients in the recipe if you exclude the garnish. It is a very straightforward dish in which the flavors of the shrimp and scallops are simply accented by tamari and black pepper.
The presentation is as important here as the ingredients. A sea scallop was to be snuggled into the curve of each shrimp and secured with a pick. I bought U16 gulf shrimp, but the gigantic sea scallops available that day would never have fit in them. I used bay scallops instead, and they fit nicely. Once assembled, I placed them back in the refrigerator while the sauce was prepared. Rather than using tamari sauce straight from the bottle, it was reduced in a double-boiler for about 40 minutes. It was to reduce by half and thicken. During this time, a thin crust or slight film formed on top of the sauce. Nischan explains that this is a salt crust and should be left behind when the reduced sauce is poured from the bowl. He suggests that removing this crust reduces the saltiness of the tamari, but I found it didn’t change the flavor much.
The prepared shrimp and scallops were seasoned only with black pepper and then brushed with the reduced tamari sauce. They were quickly seared on each side in a skillet heated with a small bit of canola oil. To serve, some of the sauce was spooned onto each plate, and the shellfish was placed on top. This couldn’t have been simpler. In the book, it’s suggested as a first course, but I served it as a main course with stir fried vegetables on the side. The vegetables found their way into the meandering sauce on the plate, and all the flavors of the meal worked together very well. Each piece is very pretty with the shrimp curling around the scallop, and they would also make nice hors d’oeuvres for a party.
Before jumping into the story of this mustard, I want to share a little bit of local news. Last night we attended a food and wine event for local food bloggers at Whole Foods’ Culinary Center. Thanks to Addie Broyles at Austin360! We had a great time meeting fellow Austin bloggers and sniffing and swirling at the blind tasting. Tyson Cole from Uchi was there for a fun demo of a fried rice ball with trout which was delicious. When asked about the upcoming second location for Uchi, he spilled that it will be on Lamar near 40th street which is closer to my house than the original. I can’t wait for it to open. We had a really nice evening, and when I got home and discovered the fleur de sel caramels in the gift bag, it was icing on the cake.
Speaking of Austin, it’s St. Patrick’s Day, and I’m not sure this town knows that. A few days ago, I popped into Sur la Table in need of a shamrock cookie cutter only to find nada. There was absolutely no recognition of this holiday to be found in the store. No shamrock cutters, no four leaf clovers, no leprechaun-covered serving platters or even simple, green napkins pulled front and center. Therefore, it is their fault that I am not showing shamrock-shaped, pistachio shortbread cookies today. Instead, my one and only measly creation in honor of this fine holiday is this spicy Guinness mustard which is from last month’s Saveur. There were some other great condiment recipes in that issue too. I’ll definitely try the homemade ketchup with some summer tomatoes, and the Worcestershire sauce recipe is filed away as well.
For this spicy mustard, just one bottle of Guinness is needed along with a cup and a half of brown mustard seeds which I found in the bulk section at the grocery store. Those are combined along with a cup of red wine vinegar, salt, pepper, ground cinnamon, cloves, nutmeg, and allspice, and it was left to sit for two days. The mixture was transferred to a food processor and processed for a few minutes. A note in the recipe states that the flavor will mellow with time, and the mustard can be stored in the refrigerator for six months.
We used some right away on simple turkey sandwiches and experienced the burst of flavor that it packs. It delivers a slight wasabi-sinus-buzz effect that I quite liked. I’m hoping we can use it all before it mellows too much. It has a grainy texture, of course, and the Guinness rounds out the flavor more so than the spices which were not very noticeable. This would be a great mustard for slathering on the some meat for roasting. I’m also toying with some kind of mustard sauce idea for salmon. It’s quick and easy and very worth your time to make a batch for St. Patrick’s Day.
I’ve stated right up top on this site that if I make something and it’s terrible, I forget it ever happened. Well, this wasn’t terrible, but I don’t feel like it turned out right either. I’m presenting it because 1. it was delicious, 2. hopefully someone can tell me what went wrong, and 3. the brittle topping was an amazing little garnish. So, I read the March issue of Food and Wine with those 20 best healthy recipes ever. This creamy caramel pudding was supposedly healthy because it’s made with two percent milk instead of cream. Someone must have overlooked the two cups of sugar in the pudding plus the nut brittle topping. But, the important thing is that is looked absolutely, insanely good in the photo in the magazine, and I wanted to make it immediately whether anyone thought it was healthy or not.
I followed the instructions for cooking the sugar and water for about eight minutes until it was a deep amber. Then, I gradually added the milk, and let it simmer for ten minutes during which time it was supposed to deepen in color. It didn’t. I let it go another 10 minutes. Still no deepening. I utterly failed to achieve that incredibly, caramelly-rich color as seen in the magazine. Check that link above and compare their color to mine. Mine is taupe at best. Did I buy milk with a bleaching agent? Was my deep amber caramelized sugar to have been closer to tar in hue? No idea.
Now, the good news: It tasted great, and the texture was just right. It wasn’t too dense like a certain butterscotch pudding I tried a few months ago, and it wasn’t too thin. It tasted like caramel. The pecan brittle topping was just a lovely accent. I followed a simple brittle recipe from After Dinner which is one of my favorite books. It requires only sugar, water, nuts, and salt. You can use a combination of nuts or all of one type. I used all pecans for this. I like to sprinkle on the salt just after spreading the brittle on a baking sheet to cool. This time, I used some espresso salt that I stumbled upon the last time I was grocery shopping. The pecans with the espresso salt did an excellent job of balancing the sweetness of the pudding. I recommend this recipe for everything but the look of the pudding and would love to hear about your results if you try it and why mine was so wrong in color.
My latest inspiration-expedition into my recipe files turned up this red lentil dal from the February 2002 issue of Living. It was from an article about healthy peas and lentils. The pea bisque with shrimp and tarragon sounded great too, but the lentils worked well as starter or snack before a late dinner of Andhra scrambled eggs. I use red lentils pretty frequently for soup, and I find that they cook much faster than other lentils. Their texture is softer, and I would say they nearly melt in your mouth. When they begin to break apart a little while cooking and thicken the broth, I get very happy.
The pretty, red lentils were rinsed and then placed in a pot with water, broth, and turmeric and left to cook for about 20 minutes. In a small skillet, butter was melted and then garlic, cumin seeds, and crushed red pepper were added. Once fragrant, that was poured into the lentils. Diced tomatoes, mint, and salt were added as well. This could be served piping hot or at room temperature. Pita chips were suggested for dipping, but we used some store-bought, whole wheat naan instead.
The cumin and mint added nice flavor, and the heat from the crushed red pepper can be adjusted to your taste. It makes a delicious and filling snack. We went diving right into it only to realize that a couple of bites with naan were enough to tide us over until mealtime. Fortunately, the leftovers re-heated nicely, and it was delicious all over again a couple of days later.
I read Mangoes and Curry Leaves when I received it a few years ago, and it’s a beautiful, informative, well-crafted book. I also have Alford and Duguid’s equally gorgeous, newer book, Beyond the Great Wall, and it’s sitting in my to-read stack. Their books are part travel memoirs, but they are mostly in-depth looks at completely authentic regional foods. Despite having enjoyed reading Mangoes and Curry Leaves, I hadn’t cooked anything from it simply because I’m a big, big chicken. I feared failing horribly at my attempts to re-create what looks so incredible in the photos, and sub-continent cuisine is not my forte. I do wish to learn though, and there’s only one way to do that. So, what we have here today is the first item I cautiously attempted, and Kurt even more cautiously tasted. He knows when there’s a good chance we’ll have a failure on our hands, and he was rightly concerned when I announced I was going to make Andhra scrambled eggs.
The introduction to this recipe explains that these eggs are like ones author Jeffrey Alford had at a tea shop in rural Andhra Pradesh which is a day’s drive north of Chennai (Madras). To make the eggs, they were whisked in a bowl with some salt while sesame oil was heated in a large skillet. Minced garlic and ginger, chopped shallots and chiles, and turmeric were added. The chiles specified here were cayenne which I can never find in local grocery stores, although I did receive a few in a CSA pick-up last summer. I used serranos instead. Those ingredients were stir-fried in the sesame oil for a couple of minutes before chopped tomato was added. After another couple of minutes the eggs were added and stirred about to mix everything together. Once just barely set, the eggs were transferred to plates and topped with chopped cilantro leaves.
I was feeling a little cocky since this was just a simple egg dish, so I went ahead and made the hot chile oil paste from the front of the book as well. This involved chopping ginger, garlic, and dried red chiles in a food processor and then placing that in a heat-proof bowl. Minced scallions were added to that bowl. Then, vegetable oil was heated in a skillet until almost smoking, it was poured over the mixture in the bowl, and it was allowed to cool. I poured this cooled mixture into a jar with an air-tight lid, and it will last in the refrigerator for up to one month. I’m looking forward to using it as a condiment on all kinds of things like grilled chicken or fish, maybe a dollop on some soup, and maybe even use some on plain scrambled eggs. For the Andhra scrambled eggs, it was an added punch to an already very flavorful dish, but we used a little anyway.
And, the result? Satisfactory all around. Kurt was pleasantly surprised with the level of success achieved here and quite enjoyed the dish. I may have worked up enough confidence to attempt some other things. I’ll have to remember to plan ahead and allow plenty of time for tracking down some ingredients like curry leaves, but I’m looking forward to learning more and experiencing more of the food described in the book.
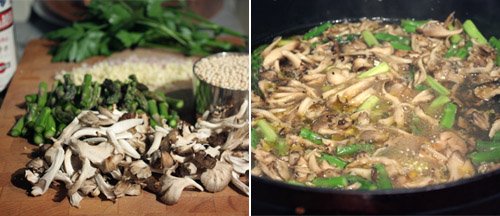
Madhur Jaffrey's World Vegetarian is so great for browsing. When I have a particular vegetable to use, I can always find several possible dishes in it that each have different cultural influences. Last week I was a lucky winner of the Foodie Blogroll bi-weekly giveaway, and I was offered a product from FromTheFarm.com. I chose the hen of the woods, or maitake, mushrooms which were over-nighted in a cooler. I did feel some carbon guilt about receiving that package from Florida, but considering that a lot of my vegetables get trucked in from California, I tried not to dwell on it for too long (and a trip to the farmers’ market the next day made me feel better).
I wanted to use the hen of the woods mushrooms in a vegetarian dish, and Jaffrey’s Israeli couscous sounded perfect. I make several variations of pasta with sauteed vegetables, but for this dish, I followed along with the instructions to try a different approach. Something I make pretty regularly for weeknight meals is broccoli with penne. For that, I blanch broccoli and then saute it with sliced garlic, a lot of extra virgin olive oil, and black pepper. When the penne is added to that, it receives some butter, and it’s served with a snowy cap of shredded parmigiano reggiano. Delicious, yes, but there’s lots of oil and butter. For this couscous dish, Jaffrey suggested sauteing garlic and shallot in some olive oil and then adding the mushrooms and then the chopped asparagus. This cooked briefly before a half cup of stock and a quarter cup of vermouth were added. The saute pan was covered, and it was left for a couple of minutes. Then, almost-fully-cooked couscous was added, it was stirred to combine, and then parmigiano reggiano and parsley were incorporated.
The result was a lighter dish in which the stock and vermouth were absorbed by the pasta pearls. The parts of this simple dish worked together exactly correctly. The vegetables were left crisp tender and fresh tasting, and the flavor of the maitakes was superb. The amount of vermouth used was enough to add another layer of flavor but not enough to leave it boozy. The vermouth and stock together was just the right amount of liquid for the couscous to absorb without making the dish like soup. I added a bit more garlic than what was listed, I usually do that, and combined with the shallot, it was fantastic. This would work nicely with orzo and other vegetable combinations too. Now I have one more delicious, and lighter, way of preparing pasta and vegetables.


 by Johanne Killeen and George Germon which I’ve gushed about a time or two. I had read through all the instructions for the lasagne, had all the ingredients, and was excited to finally get started.
 Two pounds of asparagus were roasted, onions were sauteed. The roasted asparagus was chopped and added to the onions. Milk was simmered with some lemon peel and then used to make the bechamel. All of this transpired while the rolled and cut pasta sheets dried. Said pasta sheets were then briefly boiled, shocked in ice water, and drained on towels. Then, the layering began. A baking dish was sprayed with oil, pasta sheets went into the bottom allowing for them to come up the sides and overhang the dish. Bechamel found its way onto the pasta sheets followed by grated parmigiano reggiano followed by the asparagus onion mixture and some cream. This was repeated with more pasta sheets that fit inside the ones overhanging. Once all the layers were in place, the overhanging sheets were tucked over top, and the remaining bechamel and cheese were spread about before the top was drizzled with olive oil. And, just before I nearly passed out from hunger, the lasagne went into the oven for about 30 minutes.
 Given that this was not a thirty minute meal, and that I faced certain challenges that set me back in my overall scheduling, I was completely incapable of waiting the full five minutes before cutting and serving. Hence, the photos of the plated lasagne clearly depict the wonderful bechamel and cream as it oozed forth from the layers. Even after it sat for several minutes, this wasn’t a lasagne that held its shape when cut. What I can tell you though, is that roasted asparagus and some onion in concert with a simple bechamel, really good parmigiano reggiano, and homemade pasta is more delicious than I can describe. Do make the pasta, with four eggs, and do use the cream, and find a big chunk of time when you can do all of this because like everything else from this book, it was a pure delight to eat.


 I used

 Some zest was grated from a tangerine and a lemon. The remaining peels of the tangerine and lemon were removed. I then cut off any pith that came with the peel and thinly sliced the peel. The pasta water was brought to a boil, and the juices from the tangerine and lemon were added to it. While the pasta cooked, the grated zest, egg yolks, grated parmigiano reggiano, and chopped parsley were whisked together with a little water and salt and pepper. The drained pasta was then tossed with the egg and cheese mixture, and some reserved pasta boiling water was added to thin the sauce. On the plate, it received an olive oil drizzle and a topping of sliced citrus peel. The fresh, light citrus flavor made it easy to ignore the calories lurking in the egg yolks and cheese. This was even quicker and simpler to make without the rabbit, and it was completely delicious.

 I hadn’t made waffles in ages, and it was fun to pull out that too rarely used machine again. I poured in the batter, spread it evenly, and enjoyed the waffle aroma as they cooked for a few short minutes per batch. Then, cream was whipped with honey, and fresh berries were rinsed and stemmed. Just because I can’t resist, a drizzle of pure maple syrup found its way around the berries, over the whipped cream, and into the square waffle dents where it’s meant to pool. You can make the waffles in advance and re-heat them in the oven. I actually like the crispier texture they achieve after a few minutes in the oven. We had some extras which went into the freezer for a future, big, weekend breakfast.

 I never see wild striped bass in my local stores, but I learned that I could make a special request for it at Whole Foods. Unfortunately, I learned that too late so I proceeded with snapper instead of bass. An issue that required some planning ahead with this dish was the black rice. There is a list of sources in the book which includes one for the rice, but I found
  The snapper was removed from the refrigerator and allowed to come to room temperature before being quickly seared in olive oil. After a few minutes on each side, it was removed, and the pan was wiped clean. The sauce was a simple reduction of tangerine juice into which butter was whisked and salt and pepper and tangerine segments were added. The fish was placed atop the rice, farro, and pea shoots, and the tangerine sauce and segments were spooned over all.

 The starter was measured and combined with water, bread flour, and half a cake of fresh yeast in the bowl of a stand mixer. After an initial mixing, it was left to rest for 20 minutes. Salt was added, it was mixed more, and then milk, olive oil, and more water were added. After the dough came together, it was left to ferment for two and a half hours. The big blob of wet stickiness was then turned out onto a well-floured board, sprinkled with more flour, covered, and left to sit a bit longer. At that point, the big blob was divided in two, and each was plopped onto parchment paper that had been heavily dusted with bread flour and semolina. Each loaf was dimpled by pressing my index finger all the way down to the parchment paper. More flour was sprinkled on top, they were covered and left to proof for two hours. Dough must get tired very easily as it requires more resting time than either of my cats. After that nap, the loaves were turned over, dimpled again and were finally ready to bake. The olive loaf was studded with pitted picholine olives in all of the dimples and little sprigs of fresh rosemary were tucked into the surface here and there.
 The 500 degree oven was spritzed with water before the loaves were placed inside. Now, if you have no intention of baking this bread, just do this one part. Heat your oven to 500 degrees, spritz it with water, and then put something with fresh rosemary sprigs inside it. That immediate aroma of the rosemary hitting the hot steam is simply fantastic, and when it flavors a loaf of bread with some picholine olives, it’s quite a bonus. The temperature was reduced to 450, and the loaves baked for about 35 minutes. I was concerned that my blobs were a bit wide and didn’t seem quite as tall as most ciabatta loaves I’ve seen. I wasn’t sure I would get the nice porous interior that was the goal.

 To poach the chicken:

 The prepared shrimp and scallops were seasoned only with black pepper and then brushed with the reduced tamari sauce. They were quickly seared on each side in a skillet heated with a small bit of canola oil. To serve, some of the sauce was spooned onto each plate, and the shellfish was placed on top. This couldn’t have been simpler. In the book, it’s suggested as a first course, but I served it as a main course with stir fried vegetables on the side. The vegetables found their way into the meandering sauce on the plate, and all the flavors of the meal worked together very well. Each piece is very pretty with the shrimp curling around the scallop, and they would also make nice hors d’oeuvres for a party.

 We used some right away on simple turkey sandwiches and experienced the burst of flavor that it packs. It delivers a slight wasabi-sinus-buzz effect that I quite liked. I’m hoping we can use it all before it mellows too much. It has a grainy texture, of course, and the Guinness rounds out the flavor more so than the spices which were not very noticeable. This would be a great mustard for slathering on the some meat for roasting. I’m also toying with some kind of mustard sauce idea for salmon. It’s quick and easy and very worth your time to make a batch for St. Patrick’s Day.

 Now, the good news: It tasted great, and the texture was just right. It wasn’t too dense like a certain butterscotch pudding I tried a few months ago, and it wasn’t too thin. It tasted like caramel. The pecan brittle topping was just a lovely accent. I followed a simple brittle recipe from

 The cumin and mint added nice flavor, and the heat from the crushed red pepper can be adjusted to your taste. It makes a delicious and filling snack. We went diving right into it only to realize that a couple of bites with naan were enough to tide us over until mealtime. Fortunately, the leftovers re-heated nicely, and it was delicious all over again a couple of days later.

 I was feeling a little cocky since this was just a simple egg dish, so I went ahead and made the hot chile oil paste from the front of the book as well. This involved chopping ginger, garlic, and dried red chiles in a food processor and then placing that in a heat-proof bowl. Minced scallions were added to that bowl. Then, vegetable oil was heated in a skillet until almost smoking, it was poured over the mixture in the bowl, and it was allowed to cool. I poured this cooled mixture into a jar with an air-tight lid, and it will last in the refrigerator for up to one month. I’m looking forward to using it as a condiment on all kinds of things like grilled chicken or fish, maybe a dollop on some soup, and maybe even use some on plain scrambled eggs. For the Andhra scrambled eggs, it was an added punch to an already very flavorful dish, but we used a little anyway.

 I wanted to use the hen of the woods mushrooms in a vegetarian dish, and Jaffrey’s Israeli couscous sounded perfect. I make several variations of pasta with sauteed vegetables, but for this dish, I followed along with the instructions to try a different approach. Something I make pretty regularly for weeknight meals is broccoli with penne. For that, I blanch broccoli and then saute it with sliced garlic, a lot of extra virgin olive oil, and black pepper. When the penne is added to that, it receives some butter, and it’s served with a snowy cap of shredded parmigiano reggiano. Delicious, yes, but there’s lots of oil and butter. For this couscous dish, Jaffrey suggested sauteing garlic and shallot in some olive oil and then adding the mushrooms and then the chopped asparagus. This cooked briefly before a half cup of stock and a quarter cup of vermouth were added. The saute pan was covered, and it was left for a couple of minutes. Then, almost-fully-cooked couscous was added, it was stirred to combine, and then parmigiano reggiano and parsley were incorporated.