I have a little problem. I'm addicted to cookbooks, food writing, recipe collecting, and cooking. I have a lot of recipes waiting for me to try them, and ideas from articles, tv, and restaurants often lead to new dishes. I started losing track of what I've done. So now I'm taking photos and writing about what I've prepared—unless it's terrible in which case I forget it ever happened.
Football season is in full swing, and for me, the best part of watching a game is the spread of snacks that goes along with it. I was recently contacted by The Alcalde, which is an online magazine for the University of Texas alumni, and they asked if I’d like to submit a gameday recipe for this week. I’d be useless in a conversation about football stats, but coming up with food to serve at parties, I can do. Mine is one of four gameday recipes by Austin food bloggers who also happen to have graduated from UT. I wanted to use something seasonal for fall, and sweet potatoes are plentiful right now. There’s a recipe for sweet potato cakes in the book Plenty which is where this idea started. I imagined little, crisp cakes with some added big flavors that would still be easy to pick up at a party. I made some changes to the sweet potato cakes from the book by keeping them simple with just green onion added to the batter and by forming them in a nice, small size. And, since sweet potatoes and chiles belong together, I mixed a chipotle black bean salsa to sit on top and added sour cream for tanginess.
The sweet potato cakes in Plenty have some red chiles and soy sauce in addition to chopped green onions mixed into the batter for extra flavor. I added only green onion and salt and black pepper. Big chunks of peeled sweet potatoes were steamed until tender, allowed to drain until dry, and then mashed with a potato masher. Flour, the green onions, and salt and pepper were added and mixed in by hand, and then small cakes were formed. This process could be done in advance, and the cakes could be stored on a baking sheet in the refrigerator until you’re ready to fry them. They were fried for a few minutes per side in a mix of olive oil and butter, and the butter really adds great flavor. For the chipotle black bean salsa, finely chopped chipotle, small diced yellow bell pepper, minced red onion, chopped cilantro leaves, black beans, lime juice, and some salt were combined, and that’s it. Of course, taste as you go to decide it you’d like more chipotle heat and/or salt. The salsa could also be prepared in advance. For serving, the cakes were topped with sour cream which acts like a glue and holds the salsa in place.
At this size, the cakes hold together well for picking up off a tray, and each one offers a bite or two of sweet, tangy, spicy, fresh flavors. I highly recommend them for a gameday party. Just don’t ask me who won.
Sweet Potato Cakes with Sour Cream and Chipotle Black Bean Salsa
For the sweet potato cakes: Adapted from Plenty by Yotam Ottolenghi (Makes 34 small cakes)
2 pounds sweet potatoes, peeled and chopped into large chunks
½ cup all-purpose flour
1 teaspoon salt
½ teaspoon freshly ground black pepper
5 green onions, both white and green parts, finely chopped
4-6 tablespoons extra virgin olive oil
4-6 tablespoons butter
-Steam the sweet potato chunks for 15-20 minutes until completely tender, and then transfer to a colander and allow to drain until dry.
- Once very dry, place sweet potato chunks in a large mixing bowl and mash with a potato masher to break up chunks. Add flour and finely chopped green onions, and mix with your hands to form a smooth batter. Using your hands here is best so that it doesn’t become over mixed. In a food processor, the sweet potato mixture could quickly become gummy. Taste for seasoning and add more salt and pepper if needed. Once the mixture is smooth, and the flour and green onions are mixed in, you’re ready to fry. Note: the mixture should be sticky but not wet, so more flour may be needed.
- In a non-stick skillet, heat two tablespoons extra virgin olive oil and two tablespoons butter over medium-high heat. Form round, flat cakes from about two tablespoons of batter per cake, and fry four or five at a time for three minutes per side until golden. Transfer finished cakes to a paper towel-lined baking sheet to drain and cool. Add more oil and butter to pan between batches as needed, and continue frying a few cakes at a time until all are ready for their toppings.
For the black bean salsa:
1 16 oz. can black beans, rinsed and drained
1-2 chipotles in adobo, finely chopped
1 small, yellow bell pepper, small diced
¼ cup finely minced red onion
¼ cup cilantro leaves, chopped
Juice of 1 lime
¼ teaspoon salt
-Combine all salsa ingredients, starting with one chipotle, in a small bowl and stir to combine. Taste for chipotle heat and add more if desired, and taste for seasoning and add more salt if needed. Salsa can be made in advance and stored in the refrigerator.
To assemble for serving:
½ cup sour cream
- Place sweet potato cakes on a serving platter and add a small dollop of sour cream to each. Top sour cream with a small spoonful of black bean salsa, and enjoy.
I was recently transported, metaphorically speaking, to Chile for an evening of learning about the country’s food and wine. I’d love to really go there someday, and travel along the entire long coastline. That night, I learned about wine making in Chile and how easily a diversity of plants grow in different regions of the country at the class Entertaining, Chilean Style at Central Market Cooking School. The class was taught by Ruth Van Waerebeek, house chef of Concha y Toro and owner of Hostal Gastonomico and Mapuyampay Cooking School in Chile, and I attended with a media pass. As the name of the class implied, all the dishes presented were good choices for parties, and they each hinted at both traditional Chilean cooking styles and influences from afar. For instance, cuisine from both Chile and Argentina has been affected by adopted Chinese and Japanese flavors. Traditional ceviches are combined with Asian ingredients like soy sauce and sesame oil. Influence has also come from France for both cooking and wine making. Rich buttery sauces and custards combined with local, Chilean ingredients are common, and a lot of Chilean vine stock originally came from France. And, of course, the South American enthusiasm for meat is evident in Chilean food where lamb is prevalent.
Our first dish of the class was cucumber rolls with shrimp and salmon ceviche with a spicy Asian-style dipping sauce, and this was paired with Casillero del Diablo Sauvignon Blanc. Van Waerebeek suggested briefly poaching the shrimp if it’s not absolutely, perfectly fresh. For ceviche, she prefers to only marinate the raw fish for 30 minutes, so sushi-quality freshness is key. The sauce here was a spicy mix of soy sauce, sesame oil, rice vinegar, chopped red chile, and black and white sesame seeds.
Next, we saw some of that French influence in a baked scallop dish with parmesan butter and sauteed vegetables. In season, local vegetables would be used here, and for this version, carrot and bell pepper were thinly julienned and sauteed until crisp. The vegetables were placed in the bottom of ramekins and were topped with a scallop. Smaller, bay scallops are more common in Chile, and if using those, a few would be placed on top of the vegetables. The scallops were topped with a generous bit of parmesan butter and were then broiled to just cook the scallops almost through. This dish was served with a young, light Casillero del Diablo Chardonnay.
Quinoa is one of those many plants that grows so well in Chile, and the seeds are prized for nutritional content. They were used here for a vegetarian custard. The egg and milk base was blended with pureed fresh corn, cooked quinoa was added, and sauteed, finely diced zucchini, bell pepper, and leeks were added as well. The custard was cooked in individual portions in ramekins, and the airiness of the custard was given heft by the tender pearls of quinoa. This course was served with Casillero del Diablo Carmenere, and we learned that Carmenere is the flagship varietal of Chile. It’s a light enough red wine to pair well with a range of flavors.
The quinoa custard was followed by a lamb chop served with an almond, green olive, and mint salsa. The lamb was marinated in olive oil with rosemary and garlic before being grilled, and the salsa was an easy puree of toasted almonds, green olive, fresh mint, and a little white wine to thin as needed. The wine was a robust Marques de Casa Concha Cabernet Sauvignon, and it was my favorite wine of the evening.
Dessert wasn’t a Chilean dish at all, but rather, it was a Catalonian idea for ending a meal imported from Spain. An aged Manchego cheese was served with pieces of rosemary bread and black cherry preserves, and this was paired with Casillero del Diablo Reserva Privada. Although this idea came from Spain, sheep’s milk cheeses similar to Manchego are common in Chile but are difficult to find outside the country.
Until I get a chance to trek the length of Chile, I can at least daydream about it and enjoy these dishes and wines at home. The seafood, the quinoa, and the wine will be waiting when I finally get there.
Remember last April when the Austin Bakes group organized a big bake sale benefitting recovery efforts in Japan? Well, we’re getting the band back together again, and this time, all proceeds will benefit the Austin Community Foundation's Central Texas Wildfire Fund. This fund is providing support to agencies working in Bastrop, Steiner Ranch, Spicewood, and other parts of Central Texas affected by wildfire. The bake sale is this Saturday, October 1, from 10 am until 2 pm at six locations in Austin and one location in Round Rock, and there’s also an online giving page. With the day of the bake sale approaching quickly, I needed to test a recipe for a cake that I thought might be worthy of the event. This is a cake from the book Miette, and it caught my eye when I read the book earlier this summer. It’s an easy, bundt cake, and in the book, made-from-scratch pumpkin puree is recommended. I cheated and used organic canned pumpkin puree, and the cake was lovely. With pumpkin and walnuts involved, I expected a deliciously dense crumb, but instead, this was one of the lightest and fluffiest cakes with nuts I’ve tasted. It’s adorned with just enough chocolate ganache to make it special, but just a dusting of confectioners' sugar or even leaving it plain wouldn’t have diminished this cake.
It's a good idea to generously butter a bundt pan. To be sure the cake pops out of the pan without issues, slather plenty of softened butter into all the grooves and curves of the pan. With a well-buttered and floured pan, the batter can be started. Dry ingredients including flour, baking soda, cinnamon, nutmeg, cloves, and salt were sifted into a bowl. I combined a little whole wheat flour with mostly all-purpose for the total flour quantity. Then, in a stand mixer, eggs and sugar were mixed, and vegetable oil was slowly drizzled in while still mixing. There is a note in the recipe explaining that if canned pumpkin puree is used, some water should be added. So, the puree was combined with a quarter cup of water, and that mixture was added to the mixing bowl and incorporated. The dry ingredients were slowly added, and toasted, chopped walnuts were folded into the batter. The cake baked for 50 minutes, and I waited impatiently.
As I said, this was a delightfully tender-crumbed cake. The pumpkin puree keeps it that way, and the walnuts added flavor and crunch. The chocolate ganache was completely optional, but it was such nice, subtle added touch on top, I’ll definitely include it again next time. Due to the unanimous thumbs-up review, I’ll be baking another one of these cakes for Saturday’s bake sale.
Who can turn down a good challenge? When Slow Food USA announced the $5 Meal Challenge to prove that “slow food shouldn’t cost more than fast food,” I was game. Right away, Shelley made plans to host a potluck and ground rules were set. To keep the total cost of each meal at or below $5, and assuming there would be starters, mains, sides, and desserts brought to the potluck, each serving needed to be $1.25 per person or less for a four course meal. That meant that for a dish intended to serve ten people, the total ingredient cost had to be $12.50 or less. Fortunately for me, I had just received a review copy of Quick-Fix Vegan by Robin Robertson which will be released on October 4th. When I want healthy, affordable, slow food, I turn to local, sustainable, and mostly plant-based dishes, so this book arrived right on time. Every dish in the book from starters to pasta to soups, sandwiches, salads, baked dishes, and desserts, can be on the table quickly. There are also great tips for how to stock your pantry and for preparing dishes in advance and then just baking them right before mealtime. A few of those quick dishes include coconut-curry chickpeas and cauliflower, spicy smoked portobello tacos, Indonesian satay sandwiches with peanut sauce, and ginger-cashew chocolate truffles. For the $5 Meal Challenge, the cajun-spiced dirty rice sounded like a healthy, flavorful dish to easily feed a crowd.
Now, I have to make a confession. This book’s intention is to offer meals that can be made with a minimum of fuss, but in the interest of keeping the cost down, I took a couple of extra steps. I bought organic, dried, red beans and cooked them myself, and I made my own vegetable broth. However, by doing those two steps in advance, actually the preparing the rice dish was quick and easy. I used local onions, bell peppers, and mushrooms, and the other ingredients were all organic, and the total cost per serving came in just a cent or two under $1.25. The classic Cajun trinity of bell pepper, onion, and celery was cooked first and created a base layer of flavor. Garlic, mushrooms, and a Cajun spice blend were added next and allowed to cook. Last, brown rice, red beans, vegetable broth, and salt and pepper were added. The mixture was transferred to a baking dish, and it was baked for about an hour.
Traditional Cajun dirty rice includes sausage and/or chicken giblets in rice cooked with chicken stock. Here, the ‘dirtiness’ came from beans and mushrooms, and the rice was cooked with vegetable broth. When a couple of the omnivore potluck attendees mentioned they wouldn’t have known the dish was vegan if I hadn’t told them, I took that as high praise. The aromatics and Cajun spice mix flavored the rice really well, and this is a dish that just gets better as it sits, so it’s perfectly suited to a potluck.
Cajun-spiced Dirty Rice Re-printed from Quick-Fix Vegan with publisher’s permission
1 tablespoon olive oil
1 onion, minced
1 celery rib, minced
1 green bell pepper, minced
4 cloves garlic, minced
8 ounces mushrooms, finely chopped
2 teaspoons Cajun spice blend
1 cup quick-cooking brown rice
1 ½ cups red beans or 1 (15 ounce) can, rinsed and drained
2 cups vegetable broth
Salt and freshly ground black pepper
Preheat oven to 375 degrees F. Lightly oil a three-quart baking dish and set aside. Heat the oil in a skillet over medium heat. Add the onion, celery, and bell pepper. Cover and cook to soften, five minutes. Add the garlic, mushrooms, and Cajun spice blend. Stir to combine and cook until softened, two minutes. Transfer the mixture to the prepared baking dish. Stir in the rice, beans, broth, and salt and pepper to taste. Cover tightly and cook in the oven until the rice is tender, about 50 minutes. Serve hot.
I don't eat red meat for several reasons including environmental ones, but I do eat seafood. I always try to make good, environmentally-sound and healthy decisions about which seafood to choose. It's not always easy, and the news about which type of fish is a sustainable choice seems to change daily. So, I was thrilled to see this new book from Washington, D.C. chef Barton Seaver, For Cod and Country: Simple, Delicious, Sustainable Cooking, and I received a review copy. It acts as a guide to all the issues surrounding how to choose fish, and then it provides great ideas for turning those fish into meals. Seaver explains that the best way to work towards restoration of marine ecosystems is to support the fisheries that are working responsibly and enjoy the best choices we have with lots of seasonal vegetables. And, the book assists with just that. You won't find recipes for overfished species like bluefin and yellowfin tuna, but there are several ideas for other, sustainably caught species of fish. Since some fish are seasonal, the book is organized in sections from spring to winter with side dishes and sauces made from vegetables and herbs available at each time of year. There's also an additional section for all the types of seafood that are available year round. So far, I've tried the mussels with IPA and roasted garlic and the grilled okra with charred onion dip. Both were simple dishes with big flavors. Others I look forward to trying are warm poached salmon in red wine sauce, smoked sardines with mixed greens and fig-olive dressing, pumpkin and pear panzanella with pumpkin-seed vinaigrette, and the smoked salmon and goat cheese sandwich to name a few.
Since clams, as well as mussels and oysters, are a sustainably farmed option and are always available, and since my basil plants are still going strong, I couldn't wait to try the clams with basil pesto dish. Seaver prefers the sweetness in walnuts to the flavor of pine nuts for his basil pesto. So, walnuts were toasted, and then they were tossed in a colander to remove some of the skins. Another difference with this pesto was the choice of mostly canola oil with just a little added extra virgin olive oil. The two oils and some garlic were placed in a blender and pureed, and then basil leaves and walnuts were added and blended until smooth. Then, littleneck clams were steamed in white wine. When open, the clams were transferred to a serving bowl, the cooking broth was poured into a mixing bowl while leaving any sand in the pot, and the basil pesto and some butter were stirred into the broth to form a sauce. The sauce was poured over the clams, and toasted bread was served on the side. The flavors were bright and fresh, and we used the bread to capture every bit of the sauce.
The book includes plenty of information about understanding fishing methods and how to choose fish wisely and substitute better choices for those that are overfished. But mostly, Seaver's enthusiasm for sustainable seafood, healthy portion sizes, avoiding toxins in seafood, pairing seafood with seasonal vegetables, and just plain, old, delicious cooking, make this book all about truly enjoying the best of seafood.
I have a hard time wrapping my brain around this, but my spin instructor actually complains about losing weight in the heat of the summer. Personally, I can’t imagine ever being unhappy about shedding an extra pound or two, but apparently for him, when it’s hot outside and he’s teaching several spin classes a week and can’t maintain his normal weight, it’s annoying. He dropped a hint about how since I do a lot of baking, some cookies might help with his weight loss issue. That sounded like a perfect trade-off to me. I go to him to burn calories, and he comes to me to consume calories. I used this opportunity to try the cowboy cookies from Baked Explorations, and I’m so glad to have gotten to know these particular cookies. After baking a batch and taking them to the gym, just a few days later, I was pulling out the book to bake them again for a birthday. It could have been the hint of espresso in the cookies that works wonders with the chocolate chunks, but really it was probably the salty pretzels that are stirred into the dough that made me like these cookies so much.
This is a cookie dough that needs to rest and firm up in the refrigerator, so you do have to plan ahead. The dry ingredients were whisked together, and those included flour, baking soda, baking powder, and salt. Oats were then added to that mix. Butter was creamed with granulated sugar and dark brown sugar, and an egg, egg yolk, and then vanilla were added. Espresso powder was dissolved in hot water, and that was mixed into the butter mixture. The dry ingredients were stirred into the dough, and last, chocolate chunks and broken pretzel pieces were added. The dough was left in the refrigerator for about four hours. After scooping balls of dough onto the cookie sheets, more broken pretzel pieces were pressed into the top of each dough ball. The cookies baked for twelve or so minutes, and then I wanted to eat them all.
Crunchy, chewy, chocolaty, and slightly salty cookies work for me. Now, I’ll be looking for just about any excuse to bake these again. But, since I’m not in need of increasing my calorie intake, I guess I’ll have to find a way to attend some extra spin classes.
I've always been fond of rum, and fruity, rum cocktails are delightful whether they come with an umbrella or not. The only, little problem, as I see it, with these kinds of cocktails is that they tend to have very high calorie counts. I used to make pina coladas at home from time to time, and they usually ended up being dessert. I would combine frozen pinapple chunks, some Coco Lopez cream of coconut, rum, and ice and blend until smooth. Served with a wedge of fresh pineapple and maybe a spoon if it was extra thick, it was always deliciously sweet. These days, I pay more attention to how many calories I'm consuming in beverages, so when I saw an idea for a lighter, healthier pina colada in the August issue of Living, I had to try it. The recipe isn't available online, but it's very easy as I'll describe below. For this version, rather than using cream of coconut with added sugar and stabilizers for maintaining a consistent texture, all-natural coconut water is used instead. The result is much less sweet, and the flavor is purely of pineapple and coconut.
I chopped a whole pineapple into chunks and placed the chunks in the freezer for a few hours. You don't actually need to freeze the pineapple, but it adds to the icy appeal. To make the cocktails, just add two cups of pineapple chunks, three quarters of a cup of pure coconut water, one half cup of ice cubes, one tablespoon of sugar, a teaspoon of lemon juice, and one half cup of rum to a blender. Puree until smooth, and garnish with toasted coconut.
They were frothy and smooth and just sweet enough. Full of tropical flavors, this was just as fun as a traditional pina colada. And, with about a quarter of the calories, I can once again make these cocktails as often as I like.
My books are like my kids or my cats since I don’t have children. You know what I mean. Picking a favorite just isn’t possible. Each one is special in its own way. But, when the others aren’t looking, I do sometimes point out a few that are maybe just a little bit extra special. Don’t tell them I said that. There are a lot of them. I can’t help it. One that I tend to favor is On Top of Spaghetti by Johanne Killeen and George Germon. It’s a book of nothing but pasta recipes, and pasta does make me very happy. I’ve cooked from this book many times, and I know that whatever I pick from its pages is going to be good. Whether it’s pasta with vegetables, tomato sauces, seafood, or baked pasta, the book has never let me down. It had been a while since I spent time with it, so I pulled it off the shelf a couple of weeks ago. I was looking for something light and fresh for summer. The head note to this recipe reads “this is as close to pasta salad as we get,” and that sounded perfect. I made a couple of small changes to the original ingredient list. Instead of using Scotch bonnet pepper sauce, I used some fresh, locally-grown habaneros, and since the oregano in my herb garden hasn’t survived our summer very well, I used fresh basil.
To begin, chop large tomatoes or halve cherry tomatoes as I did, and place them in a large bowl. Next, onion was minced and cucumbers were chopped, and both were added to the tomatoes. I seeded and finely chopped two habaneros rather than using pepper sauce. Then, olive oil, red wine vinegar, dried oregano, and salt were added. Fresh oregano was supposed to have been added in addition to the dried, but since my fresh oregano has about two leaves on the plant right now, I added fresh basil instead. The mix of vegetables and herbs with the oil and vinegar was set aside to allow the flavors to mingle and the onion’s sharpness to subside. Meanwhile, the pappardelle was cooked in boiling water and drained. It was then tossed with the vegetables and vinaigrette, more basil was added on top, and dinner was ready.
This isn’t intended as a chilled pasta salad. Instead, it’s a room temperature pasta dish with raw vegetables. But, it does end up being a lot of pasta which means we had leftovers. Pulling the pasta out of the refrigerator and letting it come up to room temperature before serving those leftovers worked well. The finely chopped habaneros distributed throughout all that pasta added just enough of a punch, and the layered flavor of the onion and dried oregano played well with the fresh tomato and cucumber. As it always does, this book delivered another great meal, not that I play favorites.
I know that I’m easily distracted, but sometimes that leads to very good things. The other day, I was thumbing through Donna Hay’s book Flavors looking for something, and now I don’t even remember what that was. As the pages of the chocolate chapter flipped by, I caught a glimpse of the gorgeous cake with halved pears nestled into it with a sticky, caramelly top. I had to know more about this cake. There were pears in my refrigerator that had just arrived from my CSA, and I always have cocoa powder on hand. It was entirely possible that I could go straight to the kitchen and make this cake. A quick scan of the ingredient list confirmed that I indeed had everything I would need. And, hence, off I went forgetting all about whatever it was that made me pick up the book in the first place. I’m sure I’ll think of it eventually, but for the time being, I was very happy to focus on this chocolate pear cake. It’s an easy, upside-down, fruit-filled cake with a built-in caramel sauce that ends up glistening on top and settling into the cored-out pears when the cake is turned out onto a platter.
You’ll want to use small pears, and the ones I had were just the right size. They should be peeled, halved, and cored. I use a melon baller to remove the cores from pears and then a knife to cut out any pieces of core that are missed on the edges of the pears. The pear halves were cooked in a skillet in a mixture of melted butter, brown sugar, and water. You’ll need to adjust the cooking time depending on how firm your pears are. They should soften some but still be able to hold their shape while baking. After a few minutes or so of cooking, the skillet was removed from the heat and set aside. A nine inch round cake pan was lined with parchment paper. Then, room temperature butter and more brown sugar were mixed, and three eggs were added one at a time. Flour, baking powder, and cocoa powder were sifted together and then stirred into the butter mixture. The pears were placed in the prepared cake pan cut-side down, and the buttery caramel was poured over them. The chocolate batter was spooned over the pears, and the cake baked for 50 minutes.
It’s suggested that the cake be served with cream, but I was very happy with it just as it was. With the fruit and caramel, the cake doesn’t stand a chance of becoming dry, and it didn’t last long enough to do so anyway. Chocolate, pears, and caramel were absolutely worth the distraction. Now, I should try to remember what I was looking for in the first place.
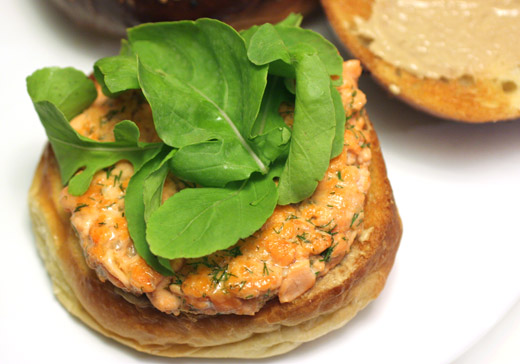
You saw this coming, didn’t you? I couldn’t rave about those brioche hamburger buns and then not tell you about a burger. The fact is that, probably, just about any burger would be delicious with one of those buns. I know this because I’ve used one of those buns for a completely boring, frozen, garden burger and quite enjoyed it. But, that was a later use of a brioche bun. For their debut, I wanted to whip up something special in the way of a burger that would be truly worthy of them. Just when I finally decided to try making those buns, this salmon burger recipe was on the top of my to-try stack. I couldn’t ignore that kind of coincidence. The burger is from the June issue of Living magazine, and it’s made from fresh salmon fillets, cold-smoked or cured salmon, and dill. They’re quick to make and hold together well. If you’d like to grill them though, you might want to use a fish or vegetable tray on top of the grill rack just in case. And, if you choose to brown them in a skillet, they cook in just a couple of minutes per side.
The recipe calls for one pound of fresh salmon and two and a half ounces of thinly sliced smoked salmon. The fresh salmon is cut into large chunks which are chilled before being pulsed in a food processor. The goal is to chop the big chunks but not to a smooth state. The smoked salmon was finely chopped by hand and then stirred into the chopped fresh salmon. Last, chopped fresh dill was added, and the patties were formed. It’s suggested that four patties be formed from the salmon mixture, but since I was dealing with some rather large buns, I divided the mixture into three portions for a better fit. After heating a little oil in a skillet, the burgers cooked for a scant two minutes per side. They just begin to brown, and the salmon barely cooks through. They were topped with mustard and arugula.
The mix of fresh and cured salmon gave these burgers a nice mix of flavors which the dill accented well. And, chopping the fresh salmon just enough but not too much is the key to great texture. For three simple ingredients, they combined perfectly for a very worthy burger.
I'm pretty excited about this. I finally made hamburger buns, and yes, that is exciting. I'd heard for years that Nancy Silverton's recipe for brioche buns was the best there is, and I put off trying it time and again. I had all sorts of excuses. These buns are a little bit decadent, they take a little time to make, and if my first test run turned out ok, I would need freezer space to store the extra buns. I finally got over the excuses, went for it, and couldn't be happier that I did. They were insanely good. I told you I was excited. The recipe is found in the Breads from the La Brea Bakery book, and that book has never disappointed. The buns are made from the raisin brioche bread dough recipe only you skip the raisins of course. It is a three-day process to make them, but not much work is involved on any of those days. The first day is for making the sponge with both sourdough starter and some yeast, and that sits for a day. The next day, the dough is mixed, and that again is left for a day to develop flavor while it ferments. Day three is for shaping the buns and baking, and the dough is so delightful to work with and smells so fantastic, you'll be happy to do this. The only change I will make next time will be to cut the dough into fourteen buns instead of twelve because even though they were shapely and kind of stunning at a nice, big size, they were a bit bigger than I expected for hamburger buns.
I did say this was a three-day bread, but it really was very easy. It only took a few minutes to mix the sponge made from water, yeast, sourdough starter, milk, and bread flour. It was covered and left at room temperature for about twelve hours and then placed in the refrigerator for twelve hours. The next day, the brioche dough was made. First, five eggs were whisked in a small bowl. Then, in the bowl of a stand mixer, the sponge was combined with half the eggs, more bread flour, and sugar. After mixing with a dough hook, the remaining eggs were slowly added. Once the eggs were incorporated, the mixer was turned to high speed, and this gives it a workout, and the dough was mixed until smooth. The stand mixer will move around from the weight of the dough, so don't walk away. Next, the fun, decadent part of brioche happens in which nine ounces of butter is slowly added piece by piece as the mixer continues at a slower speed. When the butter has all been worked into the dough, you remove the dough from the bowl and knead for a few minutes, and that's it for day two. The dough was placed in an oiled bowl, covered tightly, and left in the refrigerator to slowly ferment for a day. On the third and final day, the dough was divided into twelve pieces which resulted in rather big buns, and next time I will divide it into fourteen, but those twelve pieces of dough were left to rest under a towel for a few minutes. After resting, each piece of dough was formed into a smooth bun and placed on a parchment-lined baking sheet. Six buns fit on each of two sheets. The baking sheets were covered with towels, and the buns were allowed to proof for three hours. Before baking, I brushed them with an egg wash and sprinkled on black and white sesame seeds. They baked for a total of about 25 minutes with some water spritzing for the first five minutes.
These might be worth baking for the brioche aroma from the oven alone. But, who am I kidding? They were easily the most delicious things to sandwich a burger I've encountered. They have some give without being squishy and are easy to bite into when filled with a patty and toppings, and the flavor is all it should be with the butter, eggs, sourdough, and long, slow fermenting of the dough. Now I know, there's no need for excuses, and this is the bun I'll want for all future burgers.
I’m submitting this to Yeastspotting where you’ll find some seriously well-made bread.